Heat Mold Guide
1. Select Orthotic

JM 724 – Heel Cup (Blue Color)
Designed to offer a 12mm heel cup with semi rigid support. Excellent rear foot control. Can be worn as is or heated and molded for a custom fit.

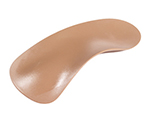
JM 722 – Narrow Dress (Tan Color)
Designed to fit in a narrow shoe. Dress style, offering a low profile that can be suitable for many shoes from a man’s dress to a ladies fashion high heel.

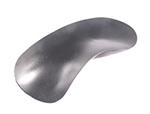
JM 722 – Wide Dress (Black Color)
Designed to support the wide foot. Has a high, exaggerated arch that cannot be worn without first molding. Chech the length and fit in the shoe before molding to make certain it will not push out on the shoe.
2. Size the Blank to the Foot
*If you fit long, be aware that you might need to bend the edge down so the patient does not feel the edge of the device when they walk.
3. Heat the Blank
Heat Gun
HOLD THE GUN 1 CM OR JUST OVER 1/2 AN INCH AWAY FROM THE BLANK.
Toaster Oven
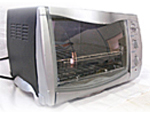 Pre-heat toaster oven to 300 degrees for 5 minutes until the oven is red hot. When the oven first comes on it is too hot until it preheats. After the oven is preheated place both orthotics inside. Pre-heat toaster oven to 300 degrees for 5 minutes until the oven is red hot. When the oven first comes on it is too hot until it preheats. After the oven is preheated place both orthotics inside. |
|---|
| Size | Approximate Time |
|---|---|
| 3-4 | 1 Minutes |
| 5-6 | 1 Minute 30 Seconds |
| 6-7 | 1 Minute 45 Seconds |
| 7-8 | 2 Minutes 15 Seconds |
| 8-9 | 2 Minutes 45 Seconds |
| 9-10 | 3 Minutes |
| 10-11 | 3 Minutes 15 Seconds |
| 12-14 | 3 Minutes 30 Seconds |
 When they are ready, pull both orthotics out of the oven and mold. If you do one at a time, you may need to reheat the second for 15-30 seconds. When the orthotics becomes soft you may push the arch all the way down to check it for mold-ability. If they are still stiff in the middle, place back in the oven for 10-15 seconds. When they are ready, pull both orthotics out of the oven and mold. If you do one at a time, you may need to reheat the second for 15-30 seconds. When the orthotics becomes soft you may push the arch all the way down to check it for mold-ability. If they are still stiff in the middle, place back in the oven for 10-15 seconds. |
|---|
4. Mold the Blank to the Foot
Molding Tips for a Great Fit
THERE ARE TWO AREAS ON THE ORTHOTIC THAT CAN CAUSE DISCOMFORT.
First is the back of the arch on the medial side. The best way to avoid this is to make certain the arch is entirely under the foot. If there is a complaint about the arch being too high, take a heat gun or paint stripper and heat the back of the arch. To avoid any problems, make certain the back of the foot is aligned all the way on the medial side. |
|---|
 The other possible area of concern is the distal edge (or front) of the orthotic. Depending on the shoe the patient is wearing, this edge may not be sitting flush in the shoe. There can be a significant gap that needs to be corrected. |
|---|
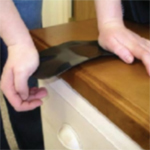 After the patient has molded the orthotic on a pillow, place it in the shoe while it is still warm. Push on the heel area with your thumb and feel the front edge with your fingers to determine if it makes a smooth transition into the shoe. After the patient has molded the orthotic on a pillow, place it in the shoe while it is still warm. Push on the heel area with your thumb and feel the front edge with your fingers to determine if it makes a smooth transition into the shoe.If there is a gap, place the orthotic on an edge and downward flex to adjust it to the shoe. You are not trying to raise the arch as much as you are adjusting the front edge. Test it in the shoe. You can also mold specific parts of the orthotic with a heat gun for adjustment as needed. Cooling them in water will not harm the material. You may see waves in the orthotic plate. This is the bony prominences of the foot that have been captured in the orthotic and is an accurate mold that should be comfortable on the foot. |
|---|
Additional Molding Techniques
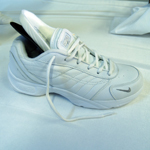 The patient can mold directly in the shoe by using the shoes insole as a heat protector. Place the hot orthotic underneath the insole and have the patient stand in place. The patient can mold directly in the shoe by using the shoes insole as a heat protector. Place the hot orthotic underneath the insole and have the patient stand in place. |
|---|
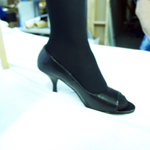 You can mold directly inside a high heel shoe if you cover the orthotic to protect the foot from the heat. You can also mold on a pillow, then modify the blank while it is still warm to fit a high heel shoe. You can mold directly inside a high heel shoe if you cover the orthotic to protect the foot from the heat. You can also mold on a pillow, then modify the blank while it is still warm to fit a high heel shoe. |
|---|
| Slightly bend the forefoot to accommodate the angle of the high heel. Make certain the distal edge is flush with the shoe so they don’t feel the edge of the orthotic. |
|---|